Bike gears are one of the most astonishing innovations in all of cycling. Gears allow us to pedal easier on the uphills, find our ideal cadence no matter the gradient, and sprint as fast as we can.
Shifters have come a long way in the past few decades. You can now shift gears at the touch of a button. In this article, we’ll explain bicycle gears, define terms like gear ratio, cross-chaining, and more, and teach you how to use bike gears most efficiently.
Next to braking, shifting is the most important thing to learn on the bike. Without shifting, you could be stuck pedaling a massive gear or a tiny one, struggling on an uphill, or pedaling until your knees hurt.
But it doesn’t have to be that way.
Bike gears make cycling more accessible and enjoyable, and with a bit of customization. They can create the fastest and most ideal setup for a variety of scenarios.
Before we dive into the specifics of shifting, let’s first define bicycle gears and the bits and bobs around them.
Contents
Defining Bike Gears and More
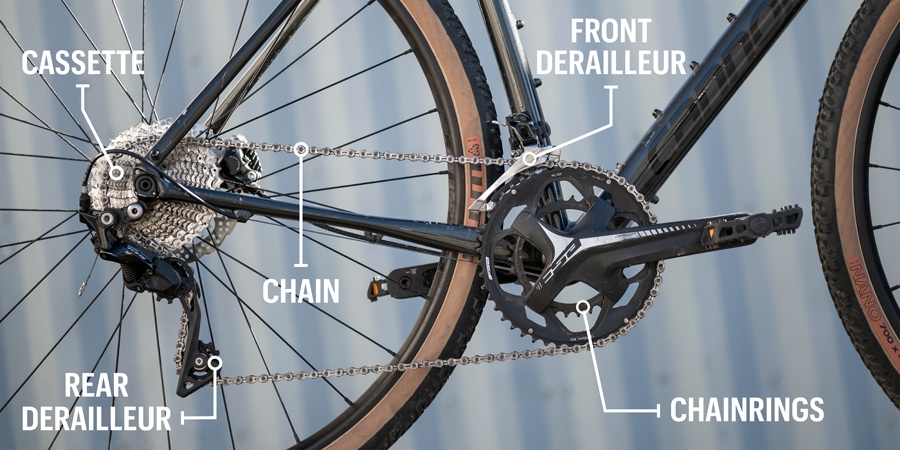
Front gears/chainring
The rings where the cranks/pedal arms attach at the bottom bracket. Bikes have either one, two, or three front gears/chainrings, and the bigger the chainring, the harder it is to pedal; the smaller the chainring, the easier it is to pedal. The smallest chainring in a triple-front ring set-up is affectionately known as the ‘granny gear’.
Most modern road bikes have two front chainrings, which are described by the number of teeth that they have. For example “53/39” means there are two front chainrings, the bigger has 53 teeth, and the smaller 39 teeth.
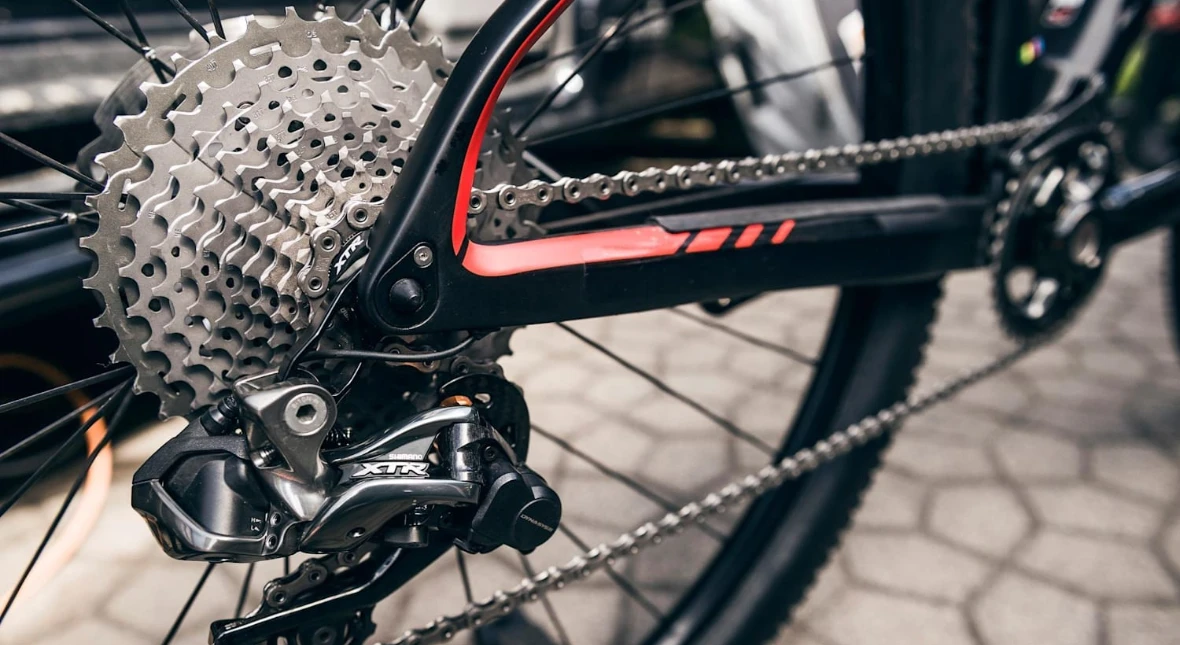
Rear gears/cog/sprocket/cassette
The chainrings at the hub of the rear wheel, known individually as ‘cogs’ or ‘sprockets’, and when put all together, they are called the ‘cassette.’ Pay attention, because the size of the chainring is now the opposite of the front chainring – the bigger the rear gear, the easier it is to pedal; and the smaller the rear gear, the harder it is to pedal.
Most modern road bikes have 8 to 11 gears in their rear cassette, which are again described in the number of teeth that they have on their ring, e.g. “11-speed 11/28” means there are 11 rear cogs that make up the cassette, the smallest ring having 11 teeth, and the biggest having 28 teeth.
Bike gear ratio
The combination of front and rear gear choice, typically expressed in ‘front x rear’ terms, such as ‘53×11’. Factored in with the circumference of the bike’s wheel and tire, the gear ratio determines how far the bike will travel with one full revolution of the cranks.
If you’ve ever heard of ‘Junior roll-out’, this is what they are testing, as a Junior bike’s gear ratio can not be greater than a specified rolling distance.
Top gear
The hardest possible gear combination/ratio, or the biggest front chainring combined with the smallest rear cog. Example: 53×11
Bottom gear
The easiest possible gear combination/ratio, or the smallest front chainring combined with the biggest rear cog. Example: 39×28
Bicycle drivetrain
All the moving parts connecting the crank to the rear wheel and therefore ‘drive’ the bike forward — basically, the bike’s chain, cassette, and chainrings.
Derailleurs
Located above the front chainrings, and below the rear cassette, derailleurs move the chain from one chainring or cog to another using input from the shifters.
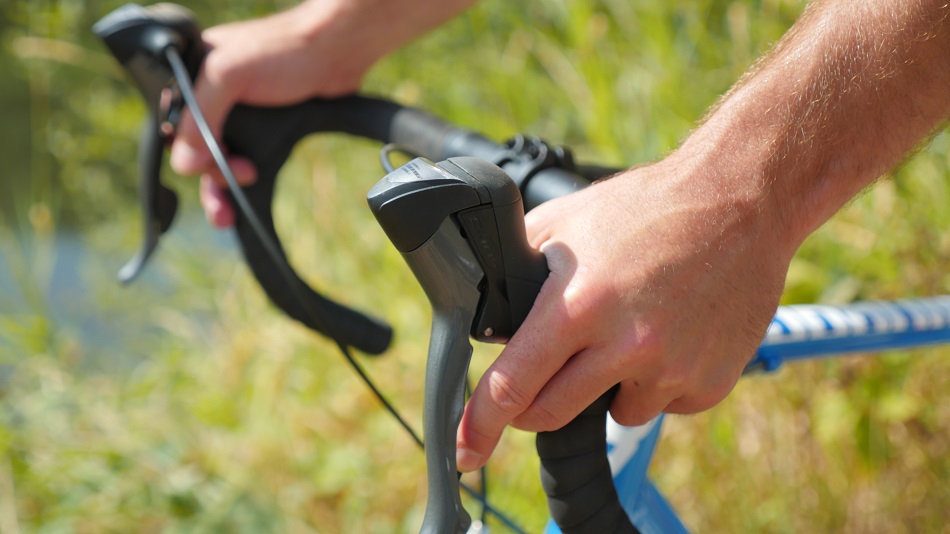
Shifters
The buttons, levers, or triggers on the left and right side of the bike’s handlebars control the front and rear derailleurs. The left-hand shifter is typically used for the front derailleur, while the right-hand shifter is used to control the rear derailleur.
Cadence
The rate at which the rider pedals (expressed in ‘revolutions per minute’, or RPM)
Teeth
Also known as ‘t’ (short for teeth). Used as ‘53t’, or a 53-tooth chainring
Bike gear
It is difficult to define ‘bike gear’, as the term is not universally defined. When someone asks, “What gear are you in?”, you could respond with a variety of answers including:
- “I’m in the 53×11.” (53-tooth chainring in the front; 11-tooth chainring in the back)
- “I’m in my biggest gear.” Or “I’m in my smallest gear.”
- “I’m in the 28.” (referring to the 28-tooth chainring in the back)
‘Bike gear’ is most often discussed in the terms of the ‘bike gear ratio’, or Answer #1 above. Riders will often say they’re in the 53×11 when they’re going fast or pushing on a downhill, or they’re in their 39×28 on a steep uphill.
Speeds
The number of different gearing combinations on a bicycle. I wish it was as easy as multiplying the number of front chainrings with the number of rear cogs, but in reality, there is often overlap between different gears. For example, a 50×32 and a 34×22 have the same gear ratio.
When asked “How many speeds is your bike?” riders will usually answer with the number of cogs in the rear cassette, as in “8-speed” or “11-speed.”
What Is Shifting?
Shifting is moving from one chainring or cog to another, up or down, from an easier gear to a harder gear, or vice versa. The front and rear derailleurs control the movement of the chain and are controlled using the shifters on either side of the bike’s handlebars.
Flat bars can be found on commuters or hybrid bikes, as well as mountain bikes, and can use many different styles of shifters. On trigger shifters, you can use your thumb to shift one way, and your finger to shift the other. Remember that the front and rear chain rings operate differently. When you shift ‘up’ to a bigger chainring, you’ll be making the front gear harder, but the rear gear easier.
Grip shifters operate by the twisting of the entire handle, allowing you to shift multiple gears at once.
On road bikes, you will find an even wider variety of shifters depending on the manufacturer, style, and capabilities. Mechanical shifters typically have two levers at the ends of the hoods, one smaller lever and one bigger. Pushing one of the levers in will change gears, depending on which side and which lever you push. For example, pushing the larger right-hand lever in will shift ‘up’ one gear on the rear cassette. That makes pedaling a little bit easier.
Electronic gears are on a whole other level, with just a tap or push of a button needed to shift gears. With some of these electronic set-ups, you can shift the front chainring by pushing both the left and right buttons in at the same time – It’s pretty cool.
How To Shift Gears On a Bike?
It might seem difficult at first, but in reality, it’s not that difficult. So – how to shift gears on a bike? When you put it all together, here’s how it looks:
- You leave home and are pedaling your road bike down a flat road. You’re in the 39×18, for example, a middle-of-the-road gear for any cyclist.
- You see a big hill approaching, and you know you’re going to need to shift. Since you are already in the ‘small ring’, or the 39t, you know that you only need to shift your rear cog.
- In order to shift from the 18t in the rear to the 28t, you push the large lever inwards on the right-hand side of your handlebar. Your rear derailleur moves the chain from the 18t to the 28t. Now you are on the steepest gradient of the climb, but still pedaling at a comfortable cadence.
- As you crest the climb, the road in front of you begins to tip downhill, and you can feel yourself picking up speed. First, you try shifting back into the 18t cog using your right-hand shifter. But now you’re speeding downhill and are pedaling too fast to keep up. In order to avoid cross-chaining (more on that in a minute), you decide not to go into the 11t in the back, and instead shift your front chainring from the 39t to the 53t. In order to do this, you push the large level inwards on the left-hand side of your handlebars, and the front derailleur moves your chain from the 39t to the 53t.
Potential Shifting Problems
As high-tech as bicycles are nowadays, they are still not perfect. There are a small number of problems that can occur with shifting, your derailleurs, or your chain.
Cross-Chaining

This happens when your chain is going across the front and rear chainrings from a little ring to a little ring, or a big ring to a big ring. Imagine looking at a bike from above. When the chain is on the 53×11, the chain is as far right as possible within the drivetrain and should line up relatively straight. However, with the chain reaching from the 53 to the 28 (53×28), the chain will be reaching from the right-most point at the front of the drivetrain, to the left-most point in the rear. This puts the chain diagonal to the drivetrain and inside the derailleur.
Cross-chaining causes the chain to rub on the derailleur, make a terrible noise, wear on the bicycle’s components, and lose efficiency.
Dropped Chain

This occurs when your chain falls off of one of your chainrings, typically one in the front. Gears themselves don’t put you at risk for a dropped chain. Rather it is your derailleur adjustments and shifting that have a greater impact. If your chain does fall off the chainring, you’ll know right away because you won’t be able to pedal. Don’t follow the Tour de France pros and try to put your chain back on while still moving. That’s a classic example of ‘Don’t try this at home!’.
Stop and see where exactly your chain is. If it is between the inner chainring and your bike’s frame, be careful when yanking it out as this can cause irreparable damage to the frame. If the chain falls off the outside chainring, make sure is back around the crank before putting it back on.
Pro tip: pull the bottom of the rear derailleur forward to put more slack in the chain when re-racking it on the chainrings. Be warned that your hands may get greasy from handling the chain – try using gloves if possible, or even an energy bar wrapper if it happens far away from home.
Shifting Tips For Beginners
 Before you even think about shifting, check to make sure what gears you have on your bike. If you’re in the market, think about what kind of riding you’ll be doing and on what terrain, and that should help guide your bike and gear purchase.
For beginner cyclists, a triple front chainring is recommended as the wider range will give you easier options to get up steep hills. If you’re thinking about taking your bike up some serious climbs, you could also look at getting a compact front chainring. This is a chainring specifically designed for climbing and is a 50×34 instead of the usual 53×39.
When it comes to finding your optimal gear, it all comes down to cadence. Everyone has their own preferred cadence, with the normal range being 80-90rpm. If you don’t have a power meter or cadence sensor on your bike, you can easily count the number of pedal strokes you do in 10 seconds and then multiple by 6 to estimate your cadence.
Related: Power Meters Explained & Best Power Meters
And when it comes to shifting, your optimal gear is whatever keeps your cadence in your preferred range. If you’re going from a flat road to a +4% grade, for example, you’re going to need to shift a handful of gears in order to stay at your optimal cadence.
Don’t overthink it – over time, shifting becomes natural, and you won’t need to count your pedal strokes or check to see which gear you’re in. Just do what feels right.
To avoid cross-chaining, don’t use the entire rear cassette of gears when using either the little or big ring upfront. For example, when in the big ring (53t), use only the bottom/smaller two-thirds of the rear cassette. And when using the little ring (39t), use only the upper/bigger two-thirds of the rear cassette. With a properly adjusted front derailleur, you will avoid major cross-chaining by using this simple method.
If you are looking for your first proper bike, take a look at our list of best bike brands.
How To Teach Bike Gearing To Kids

Most kids will start on a single-speed bike. That is a bike with just one front chainring and one rear cog – no shifting needed. But as they begin to tackle challenges and faster downhills, the next step is teaching them about gears.
Kids can easily be confused at first, so take your time when teaching them how to shift. Start from the basics and move up from there.
Kids’ bikes typically come with just one chainring up front and six or seven gears in the back. Most come with twist shifters, as we explained above, that show a number with gear. The higher the number, the harder it is to pedal; the lower the number, the easier it is to pedal.
When teaching kids how to use bike gears, first show them how to shift by twisting the handle. You can do this in the driveway, and have them practice that motion before taking them out on the road. Next, explain that the bigger the number, the harder it is to push on the pedals. So when it gets too hard, just twist the handle until you see a smaller number, and the pedaling will get easier.
No need to explain the nuances of cadence or ‘rpm’ – just tell them to pedal however is most comfortable, and they will fall into their natural cadence (which usually ends up being around 80rpm).
If possible, take them to a small hill nearby and practice riding up and down while using shifting gears. As an added bonus, they can practice braking and cornering while turning at the top and bottom of the hill.
Related: Best Bikes For Kids
Advanced Shifting Tips
We already know that cross-chaining is bad, but so far we’ve only covered major cross-chaining issues. In terms of overall efficiency, you always want to have your chain and drivetrain as straight and streamlined as possible.
Related: How To Improve Your Cycling
That is necessary in order to create the fastest and most efficient setup. Nowadays, we see track riders and time trial specialists experiment with all sorts of gearing set-ups to ensure maximum efficiency. You too can experiment with your front derailleur adjustment and perfect gearing set-up to create the ultimate time trial machine for your local ten.
Shifting is both an art and a skill. As every hill is different, and different riders prefer slightly different gearing for the same situation. Regardless, there are two skills that every rider can learn to improve their shifting: anticipating shifts and shifting quickly.
As you approach a hill or corner where you are going to need to shift, shift before you need to. This way, you’ll be shifting when there’s less stress on the drivetrain, and your cadence will stay nice and smooth. You can downshift a few clicks before stopping at a traffic light too, which will help you get going in easier gear when the light turns green.
When shifting gears, you don’t want to be pushing hard on the pedals. By doing so, you will be placing your derailleurs under a heavy load. As an extra danger, you’ll be putting yourself at risk of slipping or dropping your chain.
Being able to shift quickly will help you through a variety of situations. For example, it can save you from getting bogged down on a hill, or other similar situations. Depending on the type of shifter you have, you can twist multiple clicks, or tap three times to shift multiple gears. Practice this on a flat road or in a parking lot to get used to the feeling.
One final tip: when getting out of the saddle, shift down one gear (39×28 to 39×25) to adjust your cadence. Most riders pedal from 80-90rpm when on the saddle, and 60-70rpm when out of it. This quick gear shift will help put you in that comfortable cadence range on your favorite climb.
Frequently Asked Questions
How do you use gears on a bike for beginners?
Bike gears are very easy to use. On a typical gearing system, you will have two shifters. One will control the rear derailleur, and the other will control the front derailleur. The left-hand side shifter will shift the front derailleur up and down, and the right-hand side shifter will control the rear.
Using a smaller cog on the front will make pedaling easier, but you will go slower. Using a larger cog will make it more challenging, but you will go faster. On the rear cogs, it works the opposite.
Which gear should I use on my bike?
We recommend using all the gears on your bike and not just one. When you go up and down a hill, your gear should change to maintain maximum pedaling efficiency. When riding your bike, we recommend keeping your cadence between 70rpm to 90rpm (Revolutions per minute) while sitting and 50rpm to 70rpm when standing and changing the gear to match.
Do I change gears while pedaling?
The majority of groupsets have the ability to change gear while pedaling, and this is how they are designed to work. On a modern groupset, this won't damage it, but it's not recommended to change gears when the bike is under heavy load.
This causes heavy wear and isn't good for your chain, shifters, and cassette. It can even cause the chain to slip. It is recommended to ease off the pedaling lightly when shifting gears.
When should you shift gears?
It would be best to shift gears whenever you feel the need to. If you are coming to an uphill section, you might want to drop a few gears to make it easier to climb, or if there's a downhill part, you might want to go up a few gears so you can gain more speed. The key to good shifting is to make it work for you and change it as much as you need to.
What gear is easiest on a bike?
The easiest gear on the bike is when the chain is in the biggest cog on the rear and the smallest cog on the front. This ratio will be the easiest to use and make getting up hills easy. It won't help you when it comes to getting a new top speed though.
What gear should I use for downhill?
When going downhill, higher gears are the best. This will mean being in the big cogs on the front chainring and smaller cogs and the rear cassette. It will make spinning the wheel up easier when descending and help you achieve much higher speeds.
How do you shift gears smoothly?
The key to a smooth gear shift on a modern groupset is to pedal lightly, hit the shifter, and let the gear change fully before adding more pressure to the pedals. This will make your shift silky smooth and prolong the life of your groupset. Regular servicing will make the shifting smoother as well.
Is 7-speed or 21-speed better?
The more speeds you have, the more options for gearing you will get. This means better gearing for climbing and better gearing for descending. A 21-speed will have more options and ratios for climbing and descending but will be harder to use. A 7-speed will have fewer options but will be easier to use.
Jeremy thanks for the heads up for me to adjust my gears, I’ll probably have to go to the professionals and get it done but I have learned a lot from your step by step teachings. Man I got to learn how and when to shift. I have a Diamond Back mountain bike my brother gave me and it means a lot to me. Thanks bro, and God bless you, and your family and team.
Thanks for the informative article! I will soon purchase my first new bike in about 40 years, and MANY things have changed/improved (like what appears to be a one-piece crank arm and chainring on that Cannondale…that would be efficient!). The seat MUST be a bit more comfortable than the one on my 1983 SE Racing Quadangle (man, if I had just kept that great bike…a legendary design!).
Understanding gearing is always the “algebra” part of riding, but you’ve made it nice and clear. I suppose the challenge lies in thinking of gear abstractions while in motion, plus keeping your eyes focused on the road/obstacles ahead.
Thanks for your work!
Thank you for your comment, Jeremy!
You’ll get the hang of shifting quickly and then it becomes second nature that you don’t need to think about much.
Have fun cycling again!
thanks because I needed to know how to shift gears properly even though I’m a very young mountain biker I’m over 7
Happy we could help! Have fun cycling, Moses!