Power meters are simple. You attach them to your bike, wirelessly connect them to a head unit, do a quick calibration, and – Boom! There’s the Watts!
It’s a simple process that few of us fully understand, nor have a true appreciation of. In this article, we’ll be diving into cycling power meters. What they are, how they work, and what to be on the look out for when you’re buying one.
Cycling power meters are a tool for the masses. Almost every experienced cyclist has one nowadays, on everything from road bikes to smart trainers. What once was an extremely expensive, ‘professionals only’ lab tool is now arguably the most powerful data tool in all of cycling: the power meter.
Modern-day innovations have lowered the prices of power meters, and now, everyone wants one. There are hundreds to choose from. Different models, attaching to different parts of your bike, working in different ways, but all producing (nearly) identical numbers. So what’s the difference?
Before we get into Watts, Accuracy, Calibration, and more, we first need to understand exactly what a power meter is.
Contents
What is a Cycling Power Meter?

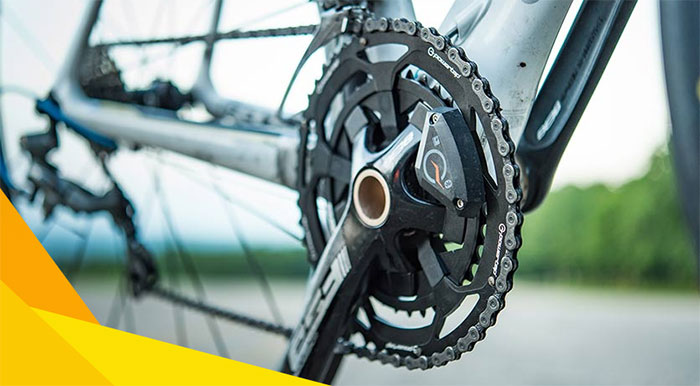
Most power meters measure the force on a given component, such as the crank arm, pedal axle, spider, or hub. They do this using strain gauges, and then calculate “power” my multiplying the strain by the angular velocity of the given component.
Sounds complicated?
Let’s break it down with some definitions:
Strain gauge – A sensor that measures the application of force. That then converts this measurement into an electrical charge which can be measured externally. Basically, when you apply force to a strain gauge, it bends (strains), and this level of displacement can be measured.
Crank – An umbrella term for the gears, crank arms, crank spider, and bottom bracket put together
Crank arms – The levers attaching the chainrings to the pedals
Spider – The section of the crank that the chainrings bolt onto
Pedal axle – The part that attaches the pedal body to the end of the crank arm
Hub – The central core of the wheel, which contains bearings and often attachment holes for spokes
Power – Force x distance / time. Measured in watts (W).
Why Does Power Matter (At All)?
If we take a little closer look at the Power formula above, we can see where all these numbers come from. Force is the energy that you are putting into the pedal, distance is how far the rider and bike travel and time is how long that whole process takes. As for the actual power meter, here’s how it works:
When we push down on the pedal, the strain gauge embedded within the power meter is bent or flexed. The degree of bend/flex depends on how much force we apply to the pedal. The power meter itself then calculates power by multiplying this force with distance/time.
Depending on where the power meter is (crank arm, pedal axle, etc.), this formula will look a little different. Either way, the power meter will spit out an easy-to-read number somewhere between one and infinity Watts (w). That’s your power output!
Related: How To Improve Your Cycling
How To Use a Power Meter

It’s easy – basically, just install them and ride!
Bluetooth capability is especially helpful when riding indoors, as this allows you to connect your power meter directly to indoor training apps such as Zwift or TrainerRoad.
Many indoor trainers come with internal power meters – namely direct-drive smart trainers – which can connect to indoor training apps.
Related: Tacx Flux Smart Trainers
Some high-end indoor smart trainers such as the Wahoo KICKR can even connect to multiple Bluetooth devices at once. That way you can connect your smart trainer to your phone, power meter, and training app simultaneously.
Power meters are expensive but are built to last
You’ve probably gathered by now that cycling power meters are expensive – the cheapest models nowadays still cost around $300. However, power meters are built to last, and I know from personal experience that a well-maintained power meter can last well over five years.
Add up the $15 per month subscriptions to Zwift or TrainerRoad, and you’re spending $180 per year. When you put that into perspective, a $500 power meter that will last 5+ years isn’t a bad investment.
Seeing the Progress
But how do you actually see the data? A power meter is typically embedded within a small component, without a way to interpret the data.
This is where head units come in – via Bluetooth or ANT+ wireless technology, a head unit such as the Garmin Edge or Wahoo ELEMNT Bolt can connect to your power meter. Some power meter models can also connect to your smartphone.
Once paired, the head unit or smartphone will display the power being measured in adjustable increments. 3-second average is probably the most common choice, while some riders prefer to see 1-second average power or 10-second average power.
Displaying your 3-second average power means that the head unit is gathering three data points (once per second) and then averaging those three numbers – that’s what you’ll see on the head unit’s screen.
By changing the length of time in measuring average power, you can opt for a smoother (10-second average) or choppier (1-second average) power display. If you’re not sure which to choose, start by displaying your 1-second average power, and if that seems too quick and chaotic for you, increase the length of time to 3 seconds, 5 seconds, or whenever feels right to you.
Sprinters may choose shorter time intervals to see their wattage spikes, while a time trial rider may choose longer time intervals when targeting a specific average power over a long period of time.
In addition to measuring power data in real time, connected devices such as head units and smartphones will be able to save the power data from each ride as its own file – these data can then be uploaded to various sites such as Strava or TrainingPeaks.
Why Power Is So Important In Cycling

Power is an external measurement of how hard you are pushing on the bike’s pedals and thus moving it forward. In most situations, power directly translates to speed.
An important caveat is that the power-to-weight ratio is most important in cycling, which is how much power you are producing at a given rider’s bodyweight (300w at 70kg is 4.3w/kg). Power (or power-to-weight ratio) is what separates the amateurs from the pros, and the good from the great. It is the difference between winning a race or losing it, and the difference between making it up a hill or having to walk.
Combined with rider weight and aerodynamics, power is the next most important factor in determining cycling speed.
Cycling Power meters allow us to directly measure our fitness gains over time.
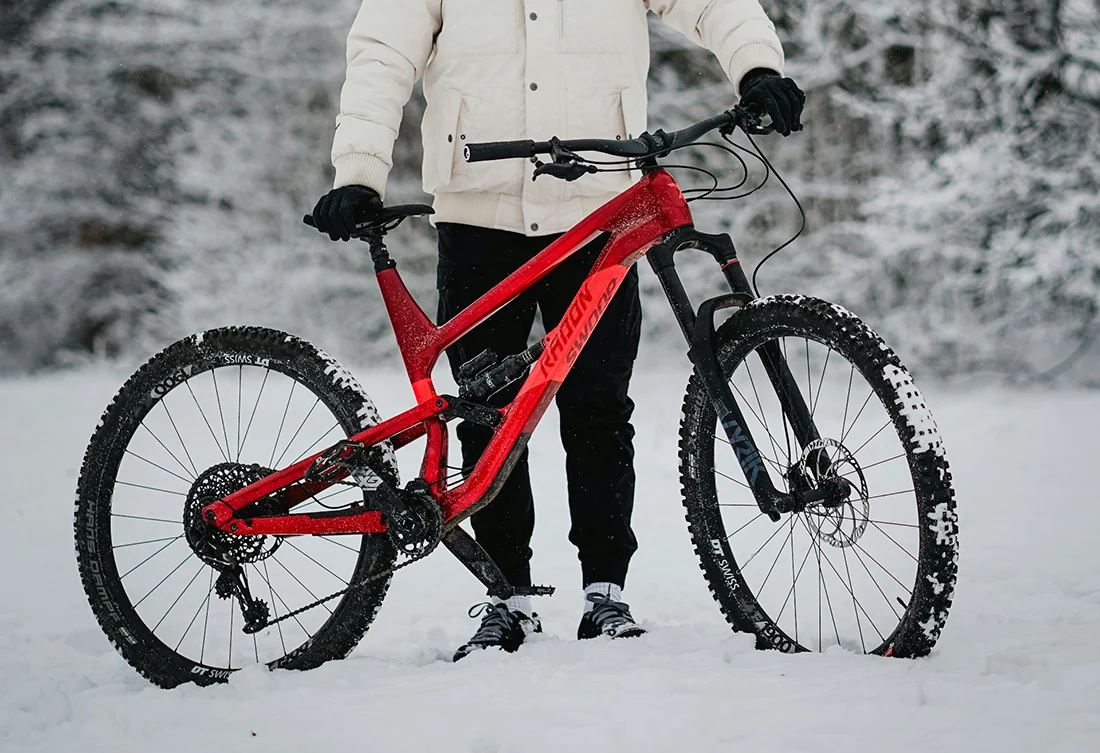
One of the best parts about power meters is that they work in all sorts of weather and wind conditions, temperatures, weights, and on different types of bikes. A Stages power meter, for example, will read the same whether it is on an old road bike or a modern time trial bike.
That way, you can compare power data across a variety of situations, testing your power in the TT position, or comparing your power between hot or cold weather.
Not everything is perfect, and so cycling power meters can malfunction in these situations as well. Rain and extremely wet roads are the most common culprit, and then there are crashes, which can definitely throw your power meter out of whack. A quick cleaning and calibration is typically all that’s needed to get the meter back to the status quo.
Types Of Power Meters

We’ve already seen that there are a few different locations that you can find a power meter. Namely the crank arm, pedal axle, and hub, as well as the bottom bracket and chainring. First, we’ll look at the similarities and differences between each type of power meter. Then we’ll tell you how to find the best power meter for you.
Related: Best Power Meters
Crank arm Power Meters
These power meters are located within the crank arm and can be easily swapped from one bike to another. These can be both single-sided or dual-sided power meters. Stages make a good number of crank arm-based power meters at a variety of price points.
Pedal axle Power Meters
Located within the pedal axle, these meters come on and off with the pedal and are super simple to move between bikes. However, they may be less accurate because of how and where they measure force and power. On the pedal, these power meters are also at a higher risk of being damaged or worn down. Garmin Rally pedals are one of the most popular power meters on the market, and like other pedal axle meters, can be either single or double-sided.
Hub Power Meters
Located in the rear hub, these power meters are a bit further from the point of rider contact (i.e. foot/shoe to pedal), thus there are some downstream losses of power due to inefficiencies in the bike’s drivetrain. Nevertheless, hub-based power meters are known for being very accurate due to the absence of outside forces acting on the strain gauges. One example of this type of power meter is the PowerTap G3.
Bottom bracket Power meters
These power meters integrated into the bottom bracket tend to be quite accurate. Another plus side is that they don’t require much maintenance once they’re installed. But therein lies the problem: bottom bracket-based power meters can be a hassle because of the wide range and ever-changing landscape of bottom bracket standards. What fits your bike this year might not fit it next year, so be wary.
Chainring Power Meters
Like bottom bracket-based meters, power meters in the chainring can be difficult to install and a hassle to swap, but they are also highly accurate, and a favorite amongst pro riders. The SRM may be the most popular power meter in pro cycling history, while the Power2Max and Quarq are not far behind. Make sure you check compatibility before springing for one of these top-end power meters.
Power Meter Features
Besides measuring power, there are a few key features to be on the lookout for when choosing a power meter:
Left/right balance
Dual-sided power meters measure the power output of both your left and right legs separately. They then combine them to give you your total power output. You can then analyze these data further by looking at your left/right balance, or the relative power outputs of your left and right legs. This is typically displayed as a percentage, “L/R: 52% / 48%”, for example.
The typical range for left/right balance is +/-5%. If you’re outside that range, there is a chance that you could be experiencing or developing a serious imbalance that could lead to chronic pain or injury.
Single-sided power meters only measure the power output of one leg (left or right) and then double that number to estimate your total power output. Most people fall into a left/right balance range of 52% / 48%, meaning a single-sided meter could be reading as much as 4% off because of the way it calculates your total power output.
Zero offset
A simple test in which the power meter reports a zero reading when there is no torque being applied to the pedals. This can – and is recommended to – be done at the beginning of each ride, as part of a simple system’s check to make sure the power meter is reading as accurately as possible. Zero offset is not the same as calibration, which is different between power meters and can either be done while riding or while stationary.
Temperature drift
The change in power meter readings is associated with changes in temperature. Strain gauges in a power meter are very sensitive, and they can easily be altered by temperature since they are incorporated into the crank arms, pedals, hubs, or spiders which heat and cool easily. High-end power meters come with a higher build quality that will be better resistant to temperature changes, making them more accurate than lower quality power meters.
ANT+ and Bluetooth
These are wireless data communication tools that send data to a recording device such as a head unit or smartphone. Many newer power meter models use Bluetooth to connect to smartphones, while older models typically use just ANT or ANT+. If you don’t ride with a head unit and use your smartphone instead, make sure that you find a power meter that has Bluetooth and smartphone connectivity.
How To Choose a Power Meter
When it comes to choosing a power meter, you’ll want to look at a few key factors:
1. Price
 High-end power meters are almost a necessity for pro-level racing. It doesn’t matter if you’re training for the Tour de France or the Zwift Premier League. A power meter will be your most valuable training tool. (Fun fact: In 2021, Bauke Mollema of Trek-Segafredo won a stage at the Tour de France without a power meter or head unit).
When it comes to indoor racing, a high-end power meter is a necessity. The Zwift Premier League requires racers to compete with a direct drive smart trainer, which almost always includes an internal power meter.
Accuracy is everything, and you can even get disqualified for inaccurate or questionable power data. If you’re seriously into indoor racing, a high-end power meter or direct drive smart trainer is well worth the investment.
Cycling Power meters allow us to directly measure our fitness gains over time.
Beginner cyclists can get away with training on feel for a while. But as soon as you set your sights on the elite ranks, you can truly benefit from a power meter.
Caffeine, temperature, stress, and fatigue will significantly affect your heart rate, making its data useless in a variety of situations.
A power meter will tell you how strong you are regardless of the situation. If you’re on a good day, your power meter will let you know, no matter how you feel, how hot it is, or how fatigued your training plan says you should be.
If you’re looking for more affordable options, take a look at Stages, PowerTap, Pioneer, and 4iiii power meters where you can find options for around $200. Single-sided meters will save you a good bit of cash. If you’re not too concerned about your left/right balance, it’s not worth it to spend the extra money.
2. Capabilities
 As discussed above, the difference between single and dual-sided power meters can be significant – up to a 4% power discrepancy, without even factoring in calibration or potential inaccuracies. Most people won’t mind the difference. If you’re a serious cyclist, it’s important to have as accurate of a power reading as possible. And that means a dual-sided meter.
Obviously, power meters embedded within a direct drive smart trainer will not work outside. So if you’re using both a direct drive smart trainer and an on-the-bike power meter (pedal axle, hub, crank, chainring, or bottom bracket-based), make sure you research the differences between the two.
Related: Best Indoor Bike Trainers
Power meters integrated into direct drive smart trainers are typically more accurate and reliable, partly due to the fact that they never leave the house.
Thus, they experience fewer temperature fluctuations, you don’t have to worry about them getting gunked up with road grime, and they won’t experience the wear and tear that you get from minor crashes or you’re bike falling over in the parking lot.
3. Compatibility
 Depending on the type of power meter you choose, and where it fits on your bike, you need to make sure that it’s compatible with whatever setup you have. I’ve made the mistake of purchasing a crank-based power meter before that didn’t fit on my bottom bracket. Oops!
Pedal-based power meters are the most transferrable option, and they fit on almost anything. Crank-based meters are a much bigger hassle. Plus you’ll have to consult the datasheet to see if your desired meter matches.
However, crank-based meters aren’t all bad. If you only need power on a single bike, a crank-based setup will allow you to swap pedals and wheels without losing out on precious power data. There are also more crank-based power meters that measure left/right data, and at a much cheaper price than pedal-based left/right options.
4. One bike or Two?
 If you want to use a single power meter on multiple bikes, you’re going to need an option that is easily transferrable from one bike to another. So a crank or bottom bracket-based option won’t be fun. You’ll want something like Garmin’s Rally pedals instead.
You should also consider pedal-based power meters if you travel a lot. Most hotel spin bikes and rental bikes give you the option to attach your own pedals. It’s a lot easier to transport a pair of pedals than you’re entire bike. That way, you can bring your training and power data on the road, with just a few turns of the screw to get your power data on almost any bike in the world.
Now that you know all about power meters, feel free to check out the best power meters on REI!
See Our Best Power Meters

I accidentally struck a Shimano Stages non – drive side crank arm very hard against a concrete kerb at speed in the dark last December . I did the offset and reset procedures and troubleshooting but it had an accuracy error of 10 percent after this . A local dealer looked at the components and concluded that the impact had permanently impaired the factory calibration and the inertia being so great thar the strain gauge was permanently damaged beyond repair . What do you make of this unmentioned “DARK SIDE” of power meters ?
Hi Robert, it’s very unfortunate that this happened to you, but that’s part of the sport. I don’t really think it’s an unmentioned “dark side” of power meters, it’s kind of logical, don’t you think? As you mentioned in your comment, you struck it ‘very hard,’ so it makes sense that it will start malfunctioning.