
Are you about to buy a new bike? Or have you just bought one and something doesn’t feel quite right? That’s probably because you still haven’t done a proper bike fitting. Until now…
Frame > Saddle > Handlebar > Cleat
Bike fitting is a quick, yet complicated process, but it makes all the difference once it is complete. It is of paramount importance in case you want to cover long distances on your bike without experiencing any discomforts or dealing with stubborn injuries.
A bike fit can be a DIY project, or professionals can do it at a bike shop that offers this kind of service. If you have the opportunity to visit a local bike shop that does bike fitting, your best option is to refer to them. However, chances are that you will have to do it yourself; but, don’t worry, it’s not rocket science.
When doing a bike fitting procedure, it is essential to look at three main parameters – bike size, saddle height, and saddle setback. In the next section, we will take a closer look at these parameters and explain some other things of importance for proper bike fitting.
Contents
How To Properly Fit A Bike – A Step by Step Guide
If you are entirely new to the bike fitting world, the best approach is to take it slowly, one step at a time. Therefore, we’ve created an easy-to-follow step by step guide which will allow you to do a bike fit at home, entirely by yourself. Take a look below to find out how to start.
#1 – Choose the Right Bike Size

If you have already bought a new bike, then it might be too late for this step. However, if you are still in the planning phase, then keep in mind that this is the most important condition to be able to achieve a proper fit.
If you end up buying a wrong bike size, even the most competent bike fit expert in the world will not be able to fix it. Make sure that the bike you buy is not too big or too small for you – either of these can cause problems later on.
In case your bike size is slightly off, you can correct that by manipulating the saddle height, the stem length, and the saddle setback, which we will explain soon. However, in case you have bought a completely wrong size bike, a proper bike fit will be quite hard to achieve.
Let’s see a few methods you can use to determine which bike size is the right one for you.
See, how to choose the right bike size
Use Bike Size Charts
Bike size charts are the go-to solution for anyone who is buying a new bike and needs to determine which size they need to get. Unfortunately, they are not a fail-proof method, and it’s possible to get the wrong size if you blindly follow their system. To use a bike size chart, all you need to know is your exact height.
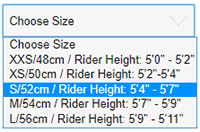 The reason errors happen is because different manufacturers use different measuring systems. The biggest problems occur when a manufacturer uses the lettering standard (S, M, L, XL), which does not always realistically depict the exact size of the bike. For example, if you’re buying a Giant model, you might need an L frame, whereas if you’re buying a Diamondback model, maybe XL will suit you better. Therefore, it’s always better to look at the numbers.
- Mountain bikes generally use the standard lettering system (S, M, L, XL) and are pretty similar from one brand to another. However, discrepancies may occur.
- Road bikes are usually represented in both the standard lettering system (S, M, L, XL) and the numerical system. Again, the sizes may differ significantly from one brand to another even if you refer to the numerical sizes. Therefore, your best option is to try your road bike in a local bike shop if possible.
- Hybrid bikes also combine the two sizing standards and are generally easier to fit than road bikes. Hybrid bikes provide a more upright position which means there is more slack for error than with elite road bikes.
Bike Fit Calculator
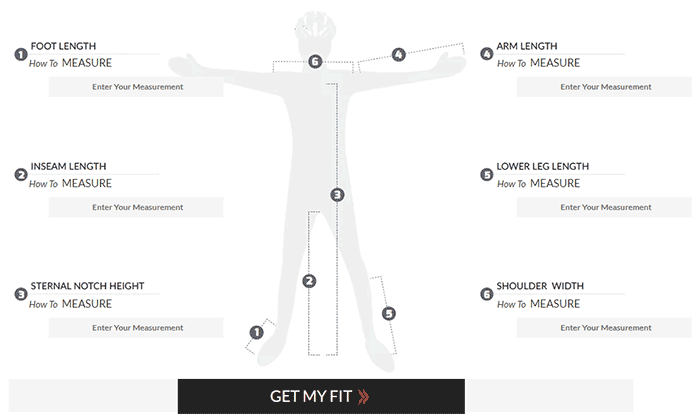
A bike fit calculator is exactly what you need for a successful DIY bike fitting endeavor. Bike fit calculators are online apps, offered by numerous websites, such as this one provided by Jenson USA.
This method is much more accurate than just addressing a bike size chart because it takes many additional measurements into account. On top of that, it’s quite straightforward to use.
To use it, you will need a tape measure, the same one all tailors have. First, you’ll answer some questions about yourself and your bike requirements, and then you’ll need to enter the measures. The requested measures include leg inseam, foot length, sternal notch height, arm length, and so on.
To get the proper measurements, it is best to have someone help you since it will be quite difficult to do it by yourself.
Even though the result you get will be more accurate than the one you come up with after using only a bike size chart, you should still take it with a grain of salt. Use it as a starting point from where you can move on to find the exact size you need.
Bike Standover Height
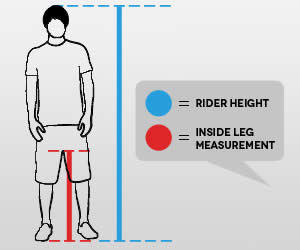 Measuring the bike standover height is one of the oldest methods for guessing the right bike size and also one of the easiest ones. It represents the difference between your inseam length and the bike’s top tube height (closest to the saddle).
This is an excellent method to use when you’re buying a bike online. Most bike manufacturers provide sizing charts of their bikes with bike standover height included. Simply measure your inseam length and compare it with the number you see in the chart.
Note: Some sources claim that road bikes require 1-2 inches of clearance between your crotch and the top tube for a comfortable fit while commuter bikes and mountain bikes require 2-4 inches. However, this method is not 100% accurate either, because some bicycles have a level top tube, while others come with a slanted top tube.
#2 – Bike Saddle Fitting

Bike saddle fitting is the next most important thing after buying the right size bike. If your saddle is not properly fitted, you may experience knee pain, Achilles issues, back pain, groin issues, and so on. Moreover, if you bought a bike that is a bit larger or smaller than you need, you may be able to fix it by fidgeting with the saddle. Let’s see how.
Saddle Height
 Adjusting your saddle height is pretty easy, and you can always quickly readjust it if you start feeling any discomfort from it.
There are two ways in which you can do it. When sitting on the bike, place your heel on the pedal in the lowest position. Your heel should be positioned flat on the pedal while your leg is completely straight.
Alternately, you can place your forefoot (the same as when you ride) on the pedal and look for a slight bend in your knee when the pedal is in the bottom position.
Make sure to wear the shoes you will be riding in when adjusting your seat to prevent any inaccuracies later on.
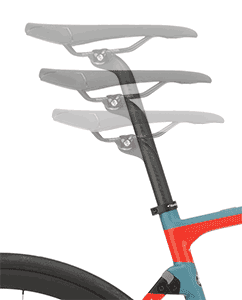
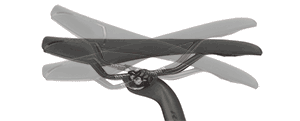
Saddle Setback
 Saddle setback, also known as saddle fore/aft position, allows you to move your saddle backward or forward to get the right fit.
The perfect saddle setback is achieved by looking at the position of your knee when your pedal stroke is at the 3 o’clock position. In this position, your knee should be located exactly above your forefoot.
If your knee is reaching forward too much, pull the saddle back a bit. If your knee is too far back, then push the saddle forward until you find the perfect position.
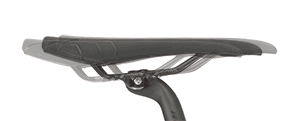
Saddle Tilt
 Saddle tilt is another very important adjustment which will save your bottom on long rides. Wrong saddle tilt can also cause back pain and other issues, so it’s important to get it right.
As a general rule of thumb, aim for a position that is perfectly level with the ground. This way, your saddle will be able to support the whole weight of your body properly. If you start feeling any pain in your crotch, try changing the tilt slightly downward or upward until you find the position that feels comfortable.
Also, you can use an app called Saddle Adjust to help you find the right angle. It’s available both on the Apple Store and on the Google Play Store. It’s simple to use – open the app, place your phone on top of your saddle, and follow the instructions.
#3 – Handlebar Fitting
Wrong handlebar fitting is responsible for back pain, neck pain, and shoulder pain. It is the place where your hands touch the bike and support at least half of your upper body weight, so finding the right position is crucial. You can adjust the handlebar reach, handlebar height, or change the handlebar size.
Handlebar Reach (Stem Adjustment)
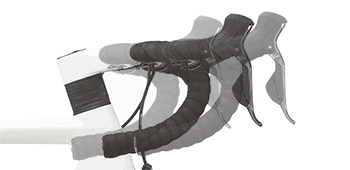 A proper handlebar reach is one of the most important conditions for enjoying long rides. If your handlebar reach is not right, the only way you can change it is by replacing the stem for a shorter or longer one.
If after some time on the bike you start feeling pain in your neck, shoulders, or the palms of your hands, there’s a good chance that you might need to adjust your handlebar reach.
To find the right handlebar reach, hop on your bike and place your hands on the handlebar in a neutral position. Ideally, if you drop a plumb line from the tip of your nose, it should fall an inch in front of the middle of the handlebar. Find a person to help you or take a photo of yourself on the bike to do it properly.
Handlebar Height
Wrong handlebar height can also be a huge source of discomfort on the bike. Adjusting the handlebar height can be tricky and may require special tools and parts, such as spacers. If you don’t know how to do it, take your bike to a local bike shop.
To find the perfect handlebar height, you should compare it to the height of your saddle. On road bikes, the saddle should be anywhere between 1-4 inches higher than the handlebar. Even more, is fine if it feels comfortable.
For recreational riding and city riding, it’s optimal to have your handlebar and your saddle level. This will provide you with a more comfortable position and give you a better view of your surroundings.
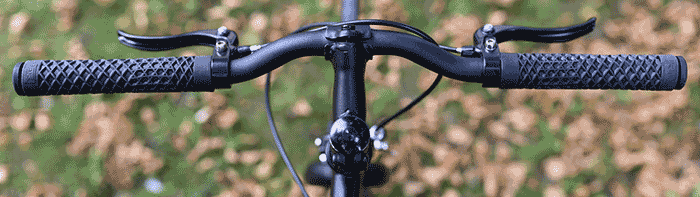
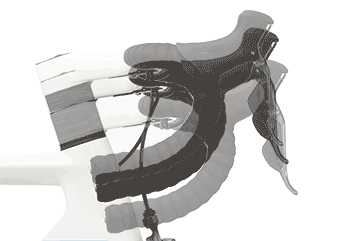
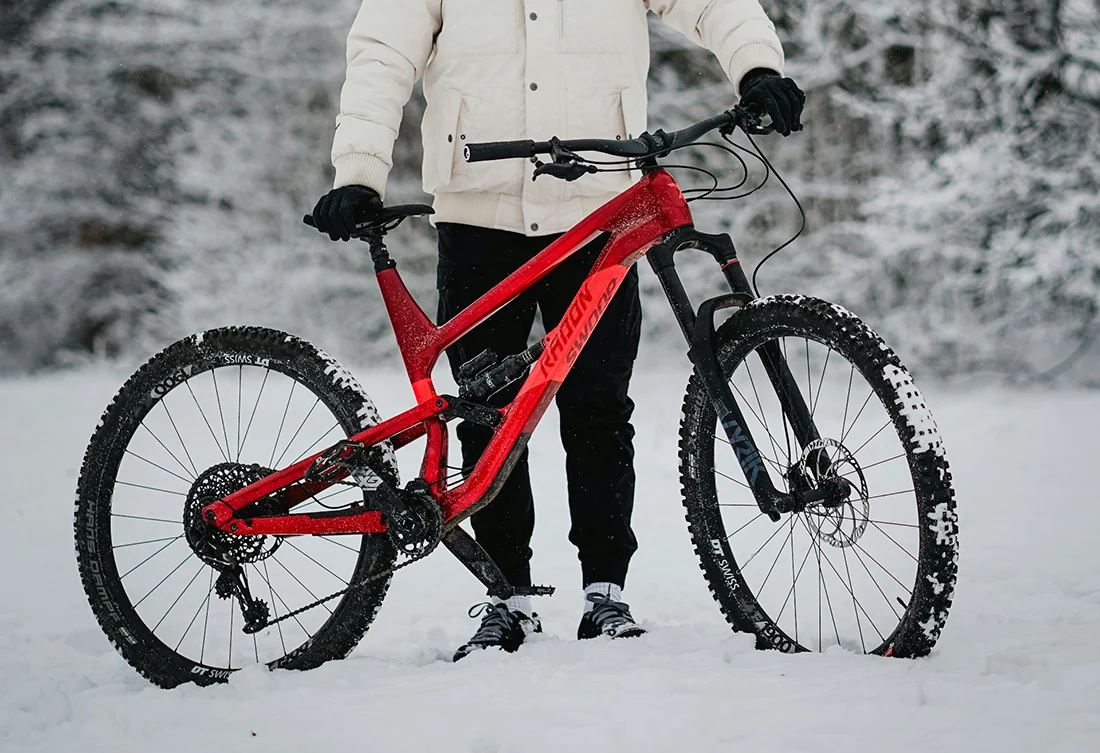
Handlebar Size / Width
![]()
When we talk about handlebar size, we usually refer to the handlebar width, which is important to maintain both performance and comfort.
To have a comfortable fit, the width of your handlebar should be the same as the width of your shoulders. However, some riders prefer having a slightly bigger or smaller handlebar, depending on their style of riding.
City rides might require you to fit through tight spaces, so you would be better off with a more narrow handlebar. On the other hand, full suspension mountain bike riders often prefer a wider handlebar because it gives them more stability and maneuverability.
#4 – Shoe Cleat Adjustments
If you are using clipless pedals, you can keep reading to find out how to adjust your cleats properly. There are two important adjustments that you need to consider: fore/aft position, and the angular position. The first adjustment is pretty easy to get right, but the second one requires a trial and error method.
Read More: How To Choose Cycling Shoes And More
- Fore/Aft cleat position
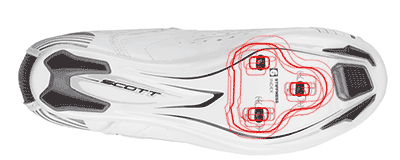
The fore/aft position gives you a chance to adjust with which part of your foot you are putting most power on the pedals. Ideally, the balls of your feet should be positioned right on top of the center of the pedals. If that’s not the case, adjust the cleats as needed by pulling them back of pushing them towards the front.
- Angular Adjustments
 Ideally, your cleat angle will allow your foot to rest naturally when you pedal. If you get the angle wrong, you might experience some knee pain, especially on the outside or the inside of your knees.
A good starting point is to draw an imaginary line through the center of your shoes and adjust the angle accordingly. Go for a couple of short rides and see how you feel.
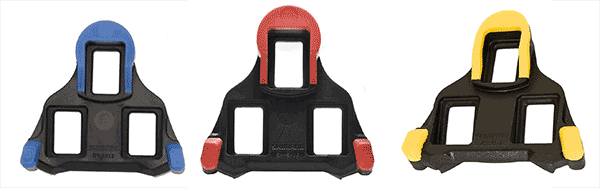
The amount of float on road bikes is dictated by fitting different cleats. Look, for example, offers three cleats:
- black is 0°
- grey 4.5°
- red 9°
Shimano’s floats
- Red 0°
- Blue 2°
- Yellow* 6.
A general rule of thumb is to rotate your foot in if you’re having pain on the outside of the knee and do the opposite for pain on the inside of your knee.
DIY or Professional: What’s the Difference?
Do It Yourself bike fit or a professional bike fit?
This is a pretty big question in the cycling world. Who needs a professional bike fit? Who can get by with a DIY bike fit? These are complicated questions. The truth is, both approaches have some advantages and disadvantages. Let’s mention some of them so you can have a better idea of which type of bike fit is more suitable for you.
DIY Bike Fit
DIY bike fit means doing everything by yourself, without a local bike shop or any other professional involved. However, you might need the help of a friend if you want to do it properly. This approach is suitable for riders who do not spend a lot of time on their bikes and don’t plan to ride competitively. However, if done correctly, it can suit more serious riders as well.
 Pros:
Pros:
- It’s completely free to do it.
- Numerous sources and tutorials are available online.
- It’s an opportunity to learn about your bike and your riding style.
- You can easily make readjustments if you do to anything wrong.
- It’s pretty fun to do it if you are patient enough.
Cons:
- It takes a lot of time to do it right.
- There’s a high chance you will do it wrong the first time.
- It needs a trial and error approach.
- It can be frustrating and give you headaches.
- If you do it wrong you can get injured.
Professional Bike Fit
A professional bike fit means taking your bike to a local bike shop that offers bike fitting services or going to a professional bike fitting center. This approach is better for competitive riders or recreational riders who spend a lot of time on their bikes.
 Pros:
Pros:
- Done by professionals who know what they’re doing.
- Low chance of errors.
- It takes less time than the DIY approach.
- Takes more variables into account.
- The process is comfortable and simple for the rider.
Cons:
- It can be quite expensive.
- It might be redundant if you’re not riding your bike often.
- Additional adjustments cost additional money.
- It’s inconvenient to do it if there are no bike fitting professionals in your area.
Professional Bike Fitting Services
Professional bike fitting services use advanced technologies which consider both the bike and the rider. These tech solutions use video recording, 3-D scans, pressure points, and more to provide you with the best possible fit. Let’s take a look at some of the most well-known professional bike fit platforms that most professionals use.
Retül Bike Fit
The Retül 3D Bike Fit System uses top of the line 3D motion capture systems that collect information about your position on the bike as you’re pedaling. The Retul bike fit system provides measurements with sub-millimeter accuracy, so it is one of the best and most precise systems out there.
It is one of the rare systems that measure riders while they pedal, most other systems use the so-called Static Bike Fit approach. The whole process takes around two hours to complete and begins with a physical assessment of your body. After that, you get fitted with 8 LED markers on important anatomical points on your body, which track your motion and provide feedback.
The Guru Fit
The Guru Fit is one of the newest and most advanced platforms out there. It allows for instantaneous remote adjustments, both vertically and horizontally, while the rider is still pedaling. This gives bike fitters the chance to react to the real-time cues they get from the riders.
GebioMized Pressure Technology
GebioMized is a German bike fit technology that looks at the three touching points between your body and the bicycle: saddle, handlebar, and footbed. It provides accurate data on the amount of pressure you put on any of these three points and shows any disbalances.
This system is perfect for minimizing any pressure points that are causing pain, such as the saddle and the handlebar, which is often where a lot of pain and discomfort comes from.
What To Expect From a Bike Fit?
 Bike fits are not cheap. Of course, with such a high price tag, you have high expectations from the whole process. And you should. There are several stages a successful bike fitting procedure needs to go through.
- The interview. The tools and software used during a bike fit are definitely important. However, the success of a proper bike fit depends more on the person doing it. The bike fit should start with an interview where they should ask about your expectations, goals, riding preferences, past injuries, discomforts, and so on.
- The physical assessment. In addition to looking at the bike and adjusting it, they also need to look at your body. Specifically, the things that matter are muscle imbalances, tight muscles, leg-length discrepancies, and so on.
- The on-bike session. This is where the biggest part of the magic happens. You will be put on a stationary trainer and have a fitter analyze your position using sophisticated software and their long experience while making any necessary corrections.
The price is usually in the $100 – $300 ballpark, depending on the bike fit and the amount of work necessary. It might seem like a lot, but it is actually cheap considering what you get. A wrong position can cause numerous – potentially serious – health problems, so it’s not a high price to pay to remain injury-free.
NOTE: Dial down your rides after the bike fitting procedure. Depending on how much your position on the bike has changed, your body will need more or less time to get used to the new setup. Your new position might feel uncomfortable in the beginning, but it should start feeling better after a couple of rides if everything is done properly.
Frequently Asked Questions
Is bike fitting worth it?
Having a bike fit will completely change the way a bike feels to ride. It will be much more comfortable, and you will be in a much more efficient position. This will mean you will be able to ride for longer distances, you will be able to ride faster, and it will stop you from getting injuries from being in the wrong position.
How do you properly fit a bike?
If you want it done properly, it's worth going to a local bike fitter. Fitting your bike yourself can be a difficult task. Many bike shops offer a bike fitting service.
How do you tell if a bike fits me?
If you want to know if a bike fits you, we recommend finding the model and size of your bike and checking if you're in the correct height range. To check the fit as far as adjustments go, it's recommended to get a bike fit, but it is possible to do it yourself.
How do I know if my bike is too big?
The first thing to do is check the model of the bike and the size and ensure that your height is correct for the bike. A bike is too big if you lean too far forward to reach the handlebars, or the saddle might not go low enough. Riding a bike that is too big for you can be uncomfortable and cause injuries.
Should your feet touch the floor on a bike?
It differs depending on the type of bike you are on. While sitting on the seat, typically, you should be able to touch the floor, but you will be on your tiptoes with both feet. You should be able to lean and have one foot flat on the ground. If both feet sit flat on the floor while you sit on the saddle, you will need more than likely need to raise the seat.
What happens if your bike seat is too low?
If your bike seat is too low, you can expect a few things to happen. Firstly you will be overstretching the knees, and if you ride for long periods of time, you will get pain in the front of the knees. Next, your hips will start to get tight because your knees are going too close to your chest, and finally, pedaling efficiency will drop, and you will find yourself going slower.
What is the correct bicycle seat height?
The correct seat height is different for everyone. If you put your heel on the pedal instead of the ball of your foot, your leg should be straight. The correct saddle height will roughly give you a 15-degree bend in the knee at the bottom of your pedal stroke.
Should my bike seat be higher than my handlebars?
If you plan on casual riding where you want to stay comfortable, then it’s recommended that your bike's saddle and handlebars should be level. If you want to race and get as aerodynamic as possible, you will want the handlebars lower than the saddle to help put you in this position.
Is it better for a bike to be too big or too small?
It is ideal to have a bike that is the correct size. You can adjust a bike that is too small to fit a larger person using a longer stem length and a layback seat post. You can also shorten a larger bike with a shorter stem and a straight seat post. A smaller bike can be adjusted to fit a larger person easier than a larger bike to fit a smaller person.
Can you ride a bike that is too big?
It is possible to ride a bike that is too big, providing the saddle will go to the correct height. A smaller bike forces the rider to lean forward a lot. You can ride a bike that is too big for you, but it won't be comfortable, and you might get back pain on longer rides.
Resources:
https://www.bicycling.com/skills-tips/a20036352/bike-fit-0/

Will this be a neutral handling bike? 73.5 parallel frame having 40.5 chain stays, 43 mm rake, 58 TT, BB drop of 72 be a neutral riding bike?
Hey Jonathan, it’s hard to tell without knowing what type of bike and what model you’re talking about, as well as what you consider to be a “neutral handling bike”.
I like how you mentioned saddle setback, also known as saddle fore/aft position, allows you to adjust the fit of your saddle by moving it backward or forward. When I was in college I think about it differently, there is really numerous information in this article that helps me. I’m grateful for your advice about bike fitting.
https://plan7coaching.com/bikefit/
Hello Jeff,
So true. A centimeter or two can really make a difference.